So I am wanting to sew you along through a few different things you can do to onesies to spice them up! I have a few more ideas in mind that will come later- but here is number 1!
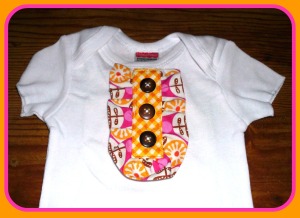
A fake button ruffle placket.
So gather the following and jump in with me:
- onesie
- small scrap of a fusible (soft preferrably) interfacing to iron to the back of the area to stabilize the knit to sew the placket one
- 18″ x 3″ strip of ruffle material
- 6.5″ piece of extra wide bias trim *I used a patterned Michael Miller Cotton Bias Trim*
- 3 buttons (and needle/thread)
- iron
Step #1
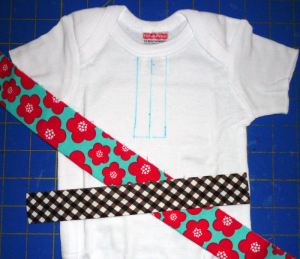
After collecting all your supplies, mark the middle of your onesie. I used a watersoluble blue pen. I marked the middle down 3″ from neckline then 1/2″ on both sides. Then iron on the fusible featherweight interfacing on the back side of that area.
Also iron open your bias tape. so it is 1″ wide.
Step #2
Open up the folds on your bias tape and sew the 2 raw edges together then fold it all back up to make a loop out of your bias tape
Step #3
Take your 18″ x 3″ piece and fold it in half to make it 18 x 1.5″ with wrong sides together so the print shows on the outside. Then IRON.
Then fold the ends right sides together and sew it closed and flip back with the right sides out:
Step #4
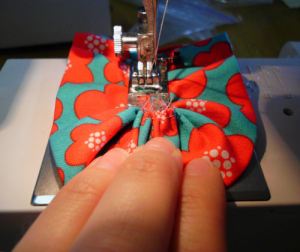
We are going to ruffle your strip. I do this easily with setting my machine to its LONGEST STITCH LENGTH and HIGHEST TENSION SETTING *which is length 5.0 and tension9 on my machine*
Start right along the raw edges of the strip. I put my finger behind the foot to help it gather like so:
Step #5
Then match the ends and raw edges together as pictured below and set your machine to a WIDE zig zag stitch. *DONT FORGET TO TURN your tension setting back*

When I get to the end, I gather a little more and square the end slightly so it will lay flat when sewn onto the shirt
Step #6
Iron your bias trim and hide your seam on the back side of the “loop”. Line the top up with the top of your ruffle you created and sew down the middle. Gather the ruffle slightly more if you notice the ruffle is longer then your bias tape.
Step #7
Line up your ruffle placket with the markings on your onesie. Sew along all edges of your bias trim. Then mark button placement and sew them on!!
You are done!


